Why You’ll Love This Recipe
-
Only four ingredients – Minimal shopping, maximum enjoyment.
-
No baking required – Quick and easy dessert with no oven needed.
-
Kid-friendly activity – Let the kids help decorate with sprinkles or colorful drizzles.
-
Customizable – Use different Oreo flavors, colors, and toppings to match your vibe.
-
Perfect for gifting – A cute and tasty homemade Easter gift.
-
Colorful and festive – Bright decorations make them pop on the dessert table.
-
Make ahead – Can be stored for several days before serving.
-
Easily scalable – Make a small or large batch depending on your needs.
-
Great for parties – Ideal for Easter brunches, potlucks, and classroom treats.
-
Super satisfying – Creamy, crunchy, sweet, and melt-in-your-mouth.
ingredients
(Tip: You’ll find the full list of ingredients and measurements in the recipe card below.)
-
Golden Oreos (1 package, 14.3 oz)
-
Cream cheese (room temperature)
-
White candy coating (e.g., Wilton candy melts, almond bark, or candiquick)
-
Gel icing colors (your choice of colors for decoration)
directions
-
Crush Cookies: Add Golden Oreos to a food processor or blender and crush into fine crumbs.
-
Mix Dough: In a bowl, combine cookie crumbs with cream cheese until well blended and a moldable dough forms.
-
Shape Eggs: Use about 1½ tablespoons of mixture per egg to form Easter egg shapes.
-
Chill: Place shaped eggs in the fridge for about 1 hour until firm.
-
Dip in Candy Coating: Melt 10 oz of white candy coating. Dip each egg using a toothpick, gently shake off excess, and set on parchment paper to dry.
-
Decorate: Once set, melt colored candy coatings (tinted with gel icing colors) and drizzle or pipe over the eggs. Add sprinkles if desired.
Servings and timing
Servings: Approximately 24 cookie balls
Prep time: 25 minutes
Chill time: 1 hour
Total time: ~1 hour 30 minutes
Variations
-
Oreo flavor swap: Try lemon, birthday cake, or classic chocolate Oreos for different flavors.
-
Dark chocolate coating: Use dark chocolate melts instead of white for a richer taste.
-
Sprinkle-only topping: Skip the colored drizzle and top with Easter-themed sprinkles for quick decorating.
-
Lemon twist: Use lemon Oreos and a dash of lemon zest in the mixture for a springy citrus flavor.
-
Easter nests: Press a dent into the top of each egg and place mini chocolate eggs inside for a nest look.
storage/reheating
Store in an airtight container in the refrigerator for up to 1 week. These cookie balls can also be frozen for up to 2 months—thaw in the fridge before serving. Do not microwave.
FAQs
Can I use regular Oreos instead of Golden?
Yes, but the dark color may show through the white coating unless using dark chocolate for dipping.
What type of cream cheese works best?
Full-fat block-style cream cheese at room temperature mixes best and gives the richest flavor.
Can I use store-bought candy coating?
Yes, Wilton melts, almond bark, or candiquick work great. Just avoid using real chocolate chips unless you temper them.
How do I make the eggs the same size?
Use a small cookie scoop or tablespoon to measure evenly.
Can I make them ahead of time?
Absolutely! They store well in the fridge for several days.
What if I don’t have gel colors?
You can skip the colors and use sprinkles or sanding sugar instead for decoration.
Do I need a food processor?
It’s the easiest method, but you can crush cookies in a bag with a rolling pin too.
Can kids help make these?
Yes! Kids love decorating them—just expect a little mess and a lot of fun.
How long does it take for the coating to dry?
About 10–15 minutes at room temperature.
Can I double the recipe?
Yes! Just double each ingredient and enjoy even more treats.
Conclusion
Easter Egg Oreo Cookie Balls are the perfect spring treat—colorful, sweet, and super simple to make. Whether you’re whipping up a batch with your kids or preparing festive desserts for a gathering, these no-bake cookie balls are sure to bring smiles and satisfy sweet cravings.
Easter Egg Oreo Cookie Balls
- Prep Time: 25 minutes
- Total Time: 1 hour 30 minutes
- Yield: 24 cookie balls
- Category: Dessert
- Method: No-Bake
- Cuisine: American
- Diet: Vegetarian
Description
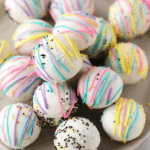
Easter Egg Oreo Cookie Balls are a festive no-bake treat made with just four ingredients! These colorful, creamy delights are shaped like Easter eggs and dipped in white chocolate, then decorated with icing and sprinkles. Perfect for spring parties, holiday gifting, or a fun family activity, these easy Oreo truffles are a guaranteed crowd-pleaser.
Ingredients
-
1 package (14.3 oz) Golden Oreos
-
8 oz cream cheese (room temperature, full-fat recommended)
-
10 oz white candy coating (e.g., Wilton candy melts, almond bark, or candiquick)
-
Gel icing colors (various pastel or bright spring shades)
Optional Toppings:
-
Sprinkles
-
Mini chocolate eggs
- Sanding sugar
Instructions
-
Crush Cookies: Add Golden Oreos to a food processor or blender and pulse until finely ground.
-
Make the Dough: In a bowl, combine Oreo crumbs and softened cream cheese. Mix until a smooth, dough-like consistency forms.
-
Shape the Eggs: Scoop about 1½ tablespoons of dough and shape into oval, egg-like forms. Repeat with remaining dough.
-
Chill: Place shaped eggs on a parchment-lined tray and chill in the fridge for 1 hour or until firm.
-
Dip in Coating: Melt the white candy coating according to package directions. Using a toothpick or fork, dip each egg into the coating, shake off excess, and place on parchment paper to set.
-
Decorate: Once dry, melt colored candy coating (tinted with gel colors) and drizzle over each egg. Add sprinkles or decorations before the drizzle sets.
-
Set and Serve: Let decorations firm up for 10–15 minutes before serving.
Notes
- Use lemon or birthday cake Oreos for fun flavor variations.
-
Add lemon zest for a springy citrus twist.
-
Use dark chocolate coating for a richer version.
- For “Easter nests”, press a small dent into each egg before chilling and place a mini egg candy on top after decorating.
